Wattle & Daub: Craft, Conservation & Wiltshire Case Study
Contents
Contents
2 History
3 Craft
3.3 Panel Types
3.4 Staves
3.6 Daub
3.7 Decoration
4.1 Soils
4.1.1 Constituents
4.1.2 Plasticity
4.1.3 Strength
4.1.4 Field Testing
4.1.5 Selection
4.2 Dung
4.2.2 Lignin
4.2.3 Urine
4.2.4 Microbial Debris
4.2.5 The Role of Dung
4.3 Fibre
5.2.3 Maintenance
5.3 Repair
5.3.1 Partial Renewal
5.4 Replacement
5.4.1 Brick Infill
5.4.2 Renewal
6.3 Fieldwork
6.5 Evaluation
| Title Page Previous Next | Conservation >Replacement >Renewal |
5.4.2 Renewal
Before a panel is renewed, it is important to first record
the existing infill. This should include: the wattle type, including wood
species, sections and type of weave; the carpentry to the frame for attaching
the wattle; the type and spacing of laths including the method of fixing; an
analysis of the daub including its constituents; the type of plaster, if any;
panel detailing or
decoration.[99]
Analysis of Daub
The analysis of a daub creates a record for archive and provides information required to specify new work. However, analysis can prove expensive and so the level of detail sought may be guided by the importance of the building. A thorough analysis is performed using a combination of field tests for soils (as described in Section 4.1.4), microscopy, sedimentation, particle size analysis and chemistry. A suitable procedure is illustrated in [100].100
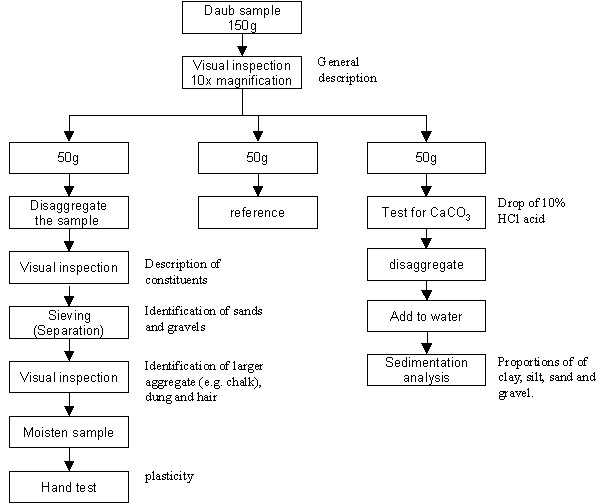
The quantitative results can be displayed diagrammatically either by plotting as a cumulative distribution chart as per BS 1377-2:1990 or using a stacked bar graph. This should be accompanied by a description of the daub: visual inspection (colour(s); additives; appearance (e.g. cracks)); strength (breaking sample); sedimentation observations; constituents identified after sieving; plasticity (how thin a length could be rolled before breaking); summary.
After the appraisal process is complete, including a structural evaluation and recording, the panel may be stripped in preparation for renewal.
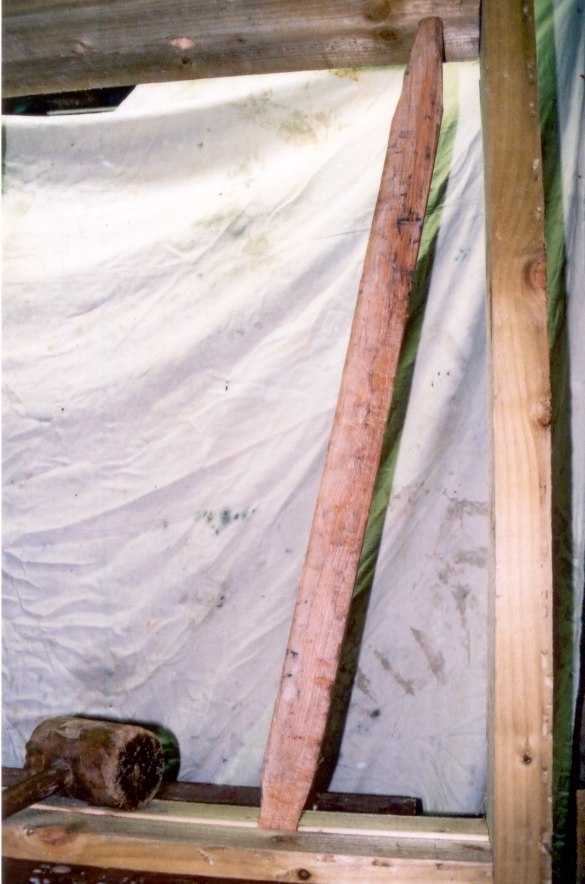
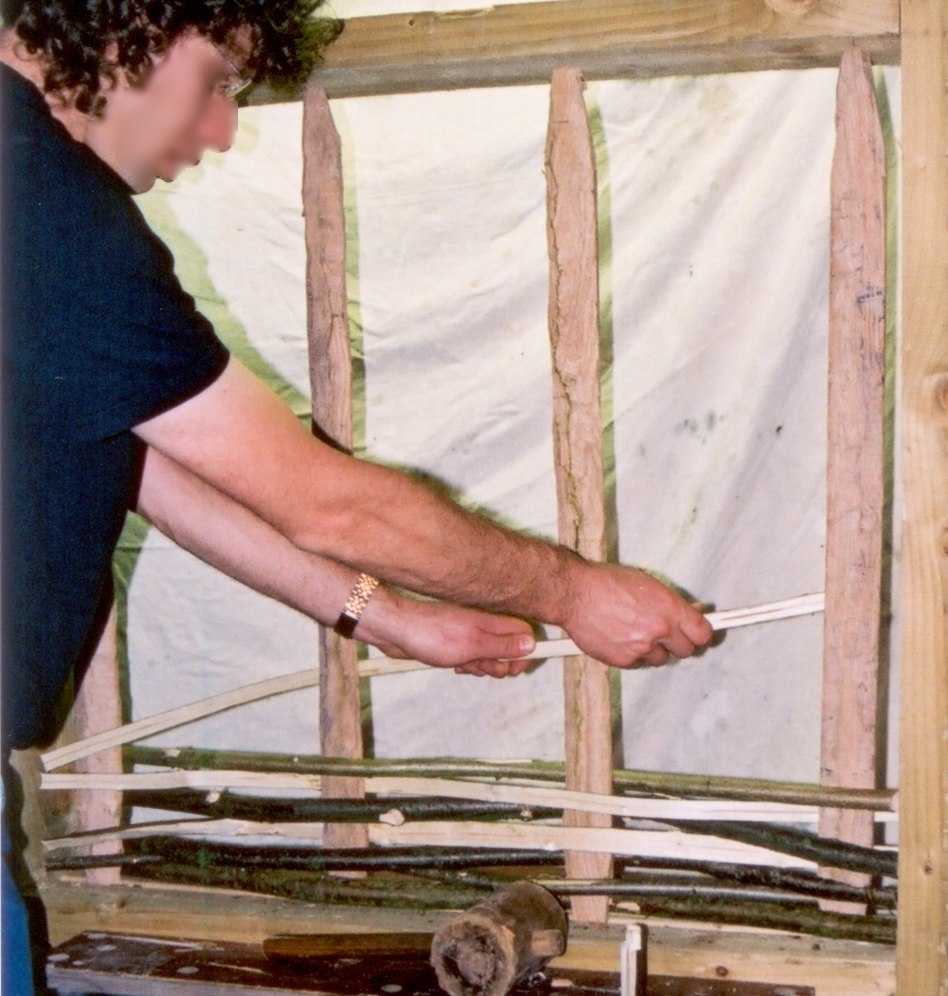
The Wattle
A backing of withies is formed by the following process:
|
Preparation of Daub
The earth should ideally be cut from the grounds of the building to avoid unnecessary transport. For a small number of panels, digging may be done by hand using only a spade. Topsoil should be stacked separately so that it may later be returned to the top after the hole is filled in. Suitably well-graded earth is most frequently found at the transition just below topsoil and above underlying heavy clay or chalky beds.
Prior to removing the required quantity of earth for the daub, a sample should be taken. This should be compared with any analysis performed on the historic daub using the tests already described. Where a match is not required, the objectives of the sample tests are to ensure the daub will have the appropriate properties to ensure easy application and a durable daub that is free from significant defects: i.e. to keep the clay content as low as possible so to avoid cracking but to produce a mix that binds. For new work, an approximate guide to a suitable earth is: [102]
|
Clay
|
5-15%
|
|
Silt
|
20-55%
|
|
Sand
|
20-55%
|
|
Gravel
|
0 to 20%
|
Excavated soils that are overall suitably graded may contain a small number of coarse gravel particles and the occasional cobble. The maximum aggregate size is defined by the need to form cats of workable size, the ability to drive a daub through the gaps in the withies or lath, and ensuring aggregate particles do not project beyond the surface of the daub. Ideally, the largest gravel and cobbles should be removed from the earth prior to mixing, although this is not vital since they can continue to be picked out during mixing, whilst forming cats or when being pressed into the backing.[103]
A suitable working area must be found. This will depend on whether the daub is to be mixed by hand (and foot) or mechanically. For hand mixing, it is preferable, albeit not a necessity, to create a wooden frame to enclose the daub so it is not gradually dispersed and lost. The frame can also be used to scrape material from boots and tools. For mechanised mixing, the expense of losing material is not so high in terms of effort and therefore can be mixed on the open surface of a yard or track. Because of the imprecise nature of the constituents of daub, a small amount of contamination, such as topsoil, is unlikely to cause a problem. Therefore, a suitable mechanical method is simply to squash it on the ground by tractor tyre, fork-lift truck, roller, caterpillar track, etc. Where available, a pug mill is stated to be ideal.[104] The traditional method of using cattle could be tried if there is a farmyard nearby to the building, although there seems to be no documented cases where this has been recently attempted. The use of a drum cement mixer has been tried for mixing cob on several occasions but runs into the same limitations as has been found more frequently with lime renders: the constituents are mixed superficially but the binder is not well integrated with the aggregate. This results in a friable mix that will yield poor results if not processed further. Drum mixing followed by hand mixing was tried and this was more successful but the advantages of this appear minimal compared to other processes. Adding extra water has also been tried but this then introduces new concerns with shrinkage cracking or necessitates controlled drying before use.[105]
Before mixing in, straw may require chopping with an axe if it is very long, whereas animal hair may be added directly. These days, hair is often bound or packaged when bought and the fibres must be separated so not to create ‘knots’ in the mix. This can be done by beating the hair with a stick whilst it is laid upon the surface of the daub.
Cow and horse dung might behave similarly in daub, but handling of the latter is wholly undesirable due to its overpowering odour that lingers on the wall, tools, boots and hands for many weeks: cow dung has a sweeter smell which is less tenacious. Conservators, especially those employing operators, should note that safe handling of dung and daubs containing dung require the use of protection due to the potential health risks such as ingestion of E. Coli. Overalls and gloves should be worn at all times. Additionally, boots and eye protection should be used when handling fresh dung.
The constituents of a daub should complement the soil and will depend on locally available materials. However, some example mixes are shown in Table 4.
|
Constituents
/parts
|
Source
|
|||||
|
soil
|
cow
dung
|
straw
(dense)
|
hair
|
lime
|
chalk
|
|
|
12
|
1
|
1
|
-
|
-
|
-
|
Ashurst and Ashurst (1988a), p.120
|
|
1
|
1
|
-
|
-
|
-
|
Reid (1989),
p.12.
|
|
|
4
|
1
|
-
|
yes
|
1
|
-
|
|
|
12[107]
|
1
|
2
|
-
|
-
|
-
|
|
|
|
1
|
-
|
2
|
3
|
||
|
12[109]
|
1
|
2
|
-
|
-
|
-
|
Wright (1991),
p.100.
|
|
7-9
|
yes
|
-
|
-
|
-
|
Thompson (2003),
p.2.
|
|
|
1
|
yes
|
|
1
|
|
Lander (1986),
p.210.
|
|
Mixing should preferably be done in a single batch to avoid
unnecessary labour and to give a consistent product. Large projects may
necessitate batching to avoid uneven mixing. A suitable hand method is shown
below:
- Place the earth into the mixing frame.
- Pick out any coarse gravel.
- Add additional aggregate or clay, as necessary, distributed evenly across the surface.
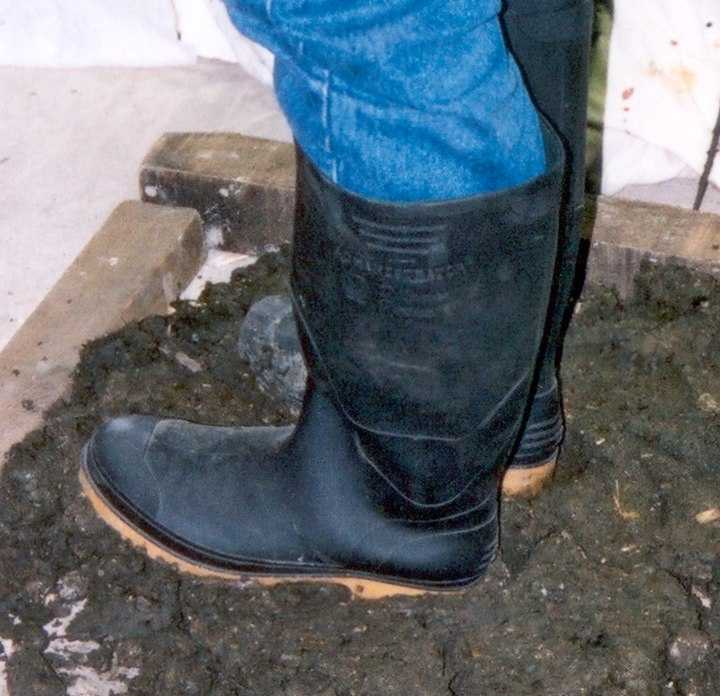
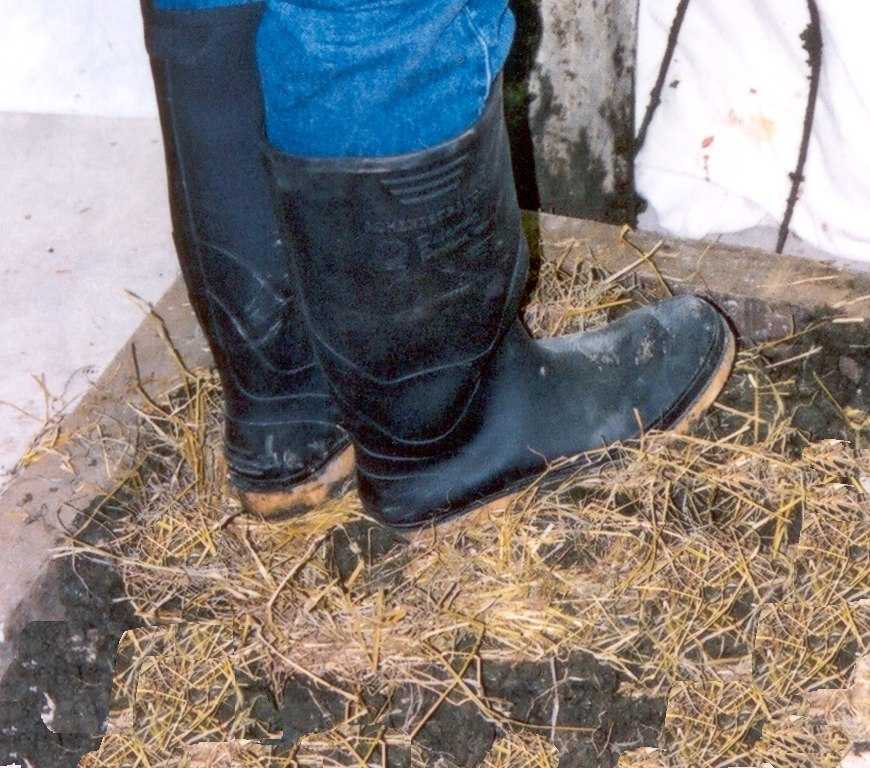
- Mix thoroughly by ‘treading’ with the heel of the boot [Figure 36]. When compacted, the daub should be lifted and turned using a shovel or ‘cob-pick’. Continue treading and turning.
- Inspect the daub at regular intervals during treading: the result should be a well-mixed ‘sandy clay’.
- A little water may be required to permit the clay to coat the aggregate and to make the daub workable, but the daub must be kept as dry as possible.
- Add cow dung and mix by treading. Add only sufficient dung to make the daub feel plastic.
- Fibre, such as hair, chopped straw or hay is scattered evenly onto the earth.
- Further treading and to complete the mixing [Figure 37].
An alternative sequence is to include the fibre at the beginning so that some of the straw may be laid under the earth prior to mixing.[112] However, this is likely to make the initial turning and mixing more difficult. It would appear that both have benefits and disadvantages and so should be regarded as a matter of preference.
A daub may be stored, but should be covered with plastic sheeting or placed in sealed containers to avoid drying out. Storage life of a completed daub is limited to a few weeks because of the risk of decay of straw or other fibre. If storage is anticipated, the addition of the fibre may be delayed until immediately prior to application. After storage, a daub will require ‘knocking up’ by way of a final mix during which the straw may be incorporated.
 |
 |
||||||
|
|
|
|
|
||||
|
|
|||||||
 |
 |
||||||
|
.
|
|
|
|
||||
Application of Daub
Prior to daubing an historic building, it is advisable to create test panels with which to verify the performance of a daub. Alternatively, a single panel should be used to evaluate the materials and workmanship prior to carrying out large-scale works. Application was either by throwing or by placing of cats.[113] From the evidence of large cracks in historic daub, throwing of a wetter mix may indeed have been a common technique but, for conservation work, it would be judicious to choose the dryer mix, placed as cats, so to minimise cracking and maximise strength.
The method by which daub cats are applied to a wattle or lath backing is as follows: [114]
|
Cracking of new daub is not a sign of poor workmanship but is caused by drying of the clay. Large cracks, those greater than, say, 2mm, may be a result of a highly shrinkable clay, excessive fines in the soil, or indicative of too much added water. Even so, lateral cracking does not necessarily mean poor bonding to the wattle: cracks are likely to be reinforced by the fibre and may therefore be considered as cosmetic. They may subsequently be filled either by reworking the re-dampened surface of the daub or by filling with fresh daub after rewetting the cracked edges. Where panels are to be plastered, cracks in the daub will subsequently be filled and may be considered positively in providing an additional key.
Evidence of intermixing at the interface of plaster and daub has been found, suggesting that plastering was sometimes done immediately after daubing. Experiments to duplicate this method at Bowhill gave satisfactory results, with few cracks transmitted up through the plaster. It was concluded that the lime might stabilise the daub at the interface, thereby inhibiting cracking.[116]
Suppliers
Supply of materials and tools to the conservation industry has much improved over the past decade and now most items required for wattle and daub renewal and repair are available from multiple sources. A guide is provided in Appendix 3.
[99]
From Ashurst and Ashurst (1988a), p.119.
[100]
Adapted from Ashurst and Ashurst (1988a), p.121.
[101]
Unlike hurdle fencing, the flat face of split withies may face
both directions to provide even keying
of daub on both sides.
[102]
Due to the imprecise nature of the material, the suggested constituents vary:
Thompson (2003), p.2 suggests percentages for clay:silt:sand:gravel as
5-10:20-50:20-50:0-20; Ashurst and Ashurst (1988a), p.119, suggest
5-15:20-55:20-55 (sand and gravel combined). Reid (1989), p.12 reports a
specification as simply a, ‘stiff sandy clay’.
[103]
Since earth for a few panels does not require much soil, the hole may often be
filled in later using spare material from the grounds. Alternatively, hardcore
may be used. The stacked topsoil should then be replaced.
[106]
Stiff sandy clay soil.
[107]
6 parts clayey soil plus 6 parts sharp sand. Dung specified as fresh.
[108]
1 part clay soil plus 1 part sand.
[109]
6 parts clayey earth (<15% clay) plus 6 parts sharp sand.
[110]
cow or horse dung.
[111]
stated as being a ‘repair mix’.
[112]
The process is described by Harrison (1999), p.22-23.
[113]
Lander (1986), p.210, suggests throwing a daub that has been made soft using
plenty of water.
[114]
Thompson (2003), p.3.
[115]
Harrison (1999).
[116]
Harrison (1999), pp.88-89 suggests that further experiments would be help test
this hypothesis and characterise the effect.